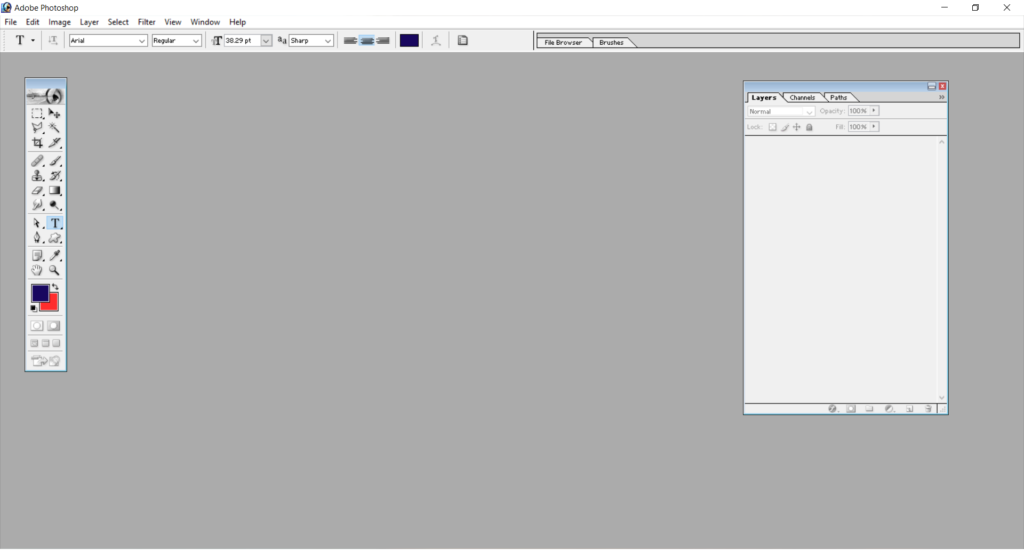
What you can see in Photoshop User Interface?
Initial Photoshop environment has the following components:

Controlling Palette
show/hide all palettes: Tab
show/hide all palettes except tools: Shift+Tab
All the palettes can be managed with Window Menu
Open an existing image
File–>Open (Ctrl+O)
(or)
Open required folder contains pictures–>Drag the picture into photoshop area
Each image will be opened in its own window. Many Images can be opened at a time but one can be activated.
Manage Opened Images
change between opened images: ctrl+Tab
Close current Image Window: Ctrl+W
Check the size of already saved image: Image menuàImage Size
Create duplicate of opened image: Image Menu–>Duplicate
Adjusting Work Area
Usually designers use keyboard shortcuts and hot keys to complete their work fast. Some times the opened palettes appear clumsy. You can more work space by simply focus on one image without any distractions. This can be possible through Full Screen mode option.
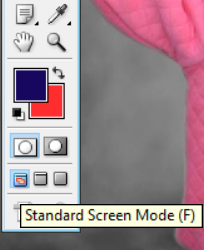
There are three options to work with the current image into full screen
Standard
FullScreen with Menu bar but no title bar
FullScreen without Menu bar and title bar

The options available at the bottom of the Tools palette. You can also change between these modes by simply pressing ‘F’
Changing Magnification level of image
view image in fit in window: Ctrl+0
view image in actual size(100%): Ctrl+Alt+0
Magnifier and Hand tools are located at the bottom of the tools palette. Magnifier is used to bring the desired portion of the image to close and also to reduce the magnification. Hand tool is used to move the image across the screen to see the remaining portion of the image when it is in magnified.
magnify image from its center: Ctrl+ +
decrease magnification from center: ctrl+ –
change to zoom in tool temporarily: hold Ctrl+space and click/drag
Change to zoom out tool temporarily: hold alt+space and click
Change to Hand tool temporarily: Hold Space and drag
All the tools of Photoshop are available in the tools palette usually appear at the left side of the screen. Each tool provides some functionality.
Some hidden tools in tools palette can be recognised by a small arrow at bottorm right corner of a tool. Hidden tool can be disclosed by holding down mouse pointer for a while or hold shift while using its respective KBS.
There are 4 categories of tools in PS:
Default name of a file in the Photoshop is Image. Every file is simply an image for the photoshop. No second page can be inserted in the same file like text-based apps.
New image in Photoshop can be created using: FileàNew (Ctrl+N)
Options in the New Image Dialog:
Size: The physical dimensions of the image should be mentioned here. Either we can choose from the predefined sizes or enter dimensions manually. Page sizes to be selected based on our final output.
Photoshop is used in different fields like Web Designing, Video Editing, Graphics other than Desktop Publishing.
Resolution: Computer generated graphics can be two types:
Raster Vs Vector Graphics:
Drawing tools can create vector graphics only.
Ex: Tools in Ms-Word, Powerpoint, Corel Draw, AutoCAD
Painting tools can create raster graphics.
Ex: Tools in Photoshop, Corel Photo-paint, FireWorks
In Photoshop we can create Raster as well as vector graphics and can convert vector graphics into raster graphics.
Pixel stands for Picture Element which is a small unit of image. Each pixel can display a color which can have values for Red,Green and Blue. Values for each Red,Green or Blue aspects of color can have 0 to 255.
Resolution is the number of pixels in the image. Resolution determines the quality of image. It depends upon the number of columns and rows by which the image display is divided. More resolution increases the memory requirement of the image.
Color Mode: The mechanism by which the color at the pixel is representing is known as color mode. There are RGB, CMYK, GrayScale, Lab color modes.
Select RGB if you are designing for screen output or select CMYK for printing purpose.
Content: used to specify the initial content of your newly created image. There are 3 options are available:
Changing background color can be done by clicking on the background color swatch.
Marquee Tools (Keyboard Shortcut : M): Useful to select a part of an image in a predefined shape. 4 marquee tools :
Selection with Marquee Tools:
Feather: used to specify the number of pixels at the edges of selection to be blurred. The value of feather should be appropriate to the selection size.
Applying feather:
Apply transform: Ctrl+T
Cancel last action: ctrl+Z
Cancel last 20 actions (History): ctrl+alt+Z
Anti-aliased: makes the edges of elliptical or circular shaped selections smooth by minimizing zigzag or staircase effect.
Style of selection:
MOVE TOOL (KBS: V)
Move tool is used to move/copy selected part to another or within image.
Select Inverse: Ctrl+shift+I
Deselect a Selection: Ctrl+D
Creating new image based on selection size:
Photoshop image can be saved in different picture formats. .psd is the default format in which the image will be stored in working state so that it can be modified later. Other formats like .jpg does not allow the image to be modified.
File menuàSave/Save As
Transform means changing the form.
Apply Transform:
Edit menu–>Free Transform (Ctrl+T)
In transform mode we can see:
upon the selected image.
Options in the options bar while transforming:
With transforming we can:
To come out from transform with saving:
press commit button on option bar
(or ) press ctrl+Enter (alphanumeric keypad)
(or) press Enter (numeric keypad)
To come out from transform without saving:
press cancel button on option bar
(or) press Esc key
To apply transformation to selection:
Select menu–>Transform selection
(or) alt+s+t
Lasso: used to make free hand selections. It can’t be used for large area selections as it is required to hold down mouse key continuously until the selection was completed. (KBS: L). Generally used to modify the selections.
Using Lasso Tool:
Polygon Lasso (KBS: Shift+L): used to make polygon shape selections.
Using Polygonal Lasso:
Magnetic Lasso (KBS: Shift+L): it traces and creates the selection points automatically while you are moving the mouse pointer around the part to be selected.
Using Magnetic Lasso:
Magnetic Lasso traces points based on some options selected.
Options of Magnetic Lasso:
Width: specify the area from which point to be selected. Set caps lock on to change between actual/precision mode. Use ] or [ keys to increase/decrease lasso width
Edge Contrast: values from 1% to 100%. Set higher value if edges of selection are very clear from background. Set lower value to select low contrast edges
Frequency: values from 0 to 100. Higher the value picks the points quickly.
Pen pressure: option useful only when working with Tab
Magic Wand (KBS: W): used to select pixels in the image having similar color values of the pixel upon which clicked.
Using Magic Wand:
Desaturate an image: Ctrl+Shift+U (or) Image menuàAdjustmentsàDesaturate
Open Hue/Saturation dialog box:
Ctrl+U (or) Image menuàAdjustmentsàHue/Saturation
Adjust Brightness/Contrast: Image Menuà Brightness/Contrast
There are two color swatches can be seen at the bottom of tools palette that allow us to select some working color.
There are two types of colors:
Using Color Picker to select foreground/background color:
Selecting a color numerically:
exchange fore/background colors: X
change fore/background colors to default: D
Photoshop selection tools are different than any other painting software. A selection in the Photoshop image is treated independent from its selected part. This strange behavior enables us to create new shapes and do more things like controlling painting tools, filters.
Selection can be moved, transformed independent of its selected part. In other words, we can do more things with the same selection. A selection can also be done even in the transparent background.
Selections can be extended or condensed with the help of selection modifiers.
Selection Modifiers:
Fill foreground color to selection: alt+backspace
Fill background color to selection: ctrl+backspace
Open fill dialog box: shift+backspace (or) shift+F5
Apply stroke for the selection outline: Edit menuàstroke
Fill from History – alt+ctrl+backspace
You cannot copy content of this page
WhatsApp us to know more about your Course
